Physics-based 2D game in Java, Pt 1
When it comes to learning a new skill, I've found the best way to master it is to turn it into a game. When I was first learning programming, I was bored to my core with lessons concerning data structures, syntax, logic statements, and all other kinds of screengarble. Sure, I learned how to print a statement; to load a file, to animate a button-press... but I didn't see the true value in those skills until I could use them to make something fun
In this lesson, we will make a simple physics game to demonstrate many of the basic features of programming, and how those features can combine to create interesting and fun results. Instead of showing every class in it's entirety at first, I will build the program in sections and explain their purpose.
This is what the final result will look like. You control the green ball, and your goal is to put in entirely in the grey area. Clicking on the screen throws the ball toward your mouse. Clicking also resets the game after you make a goal.
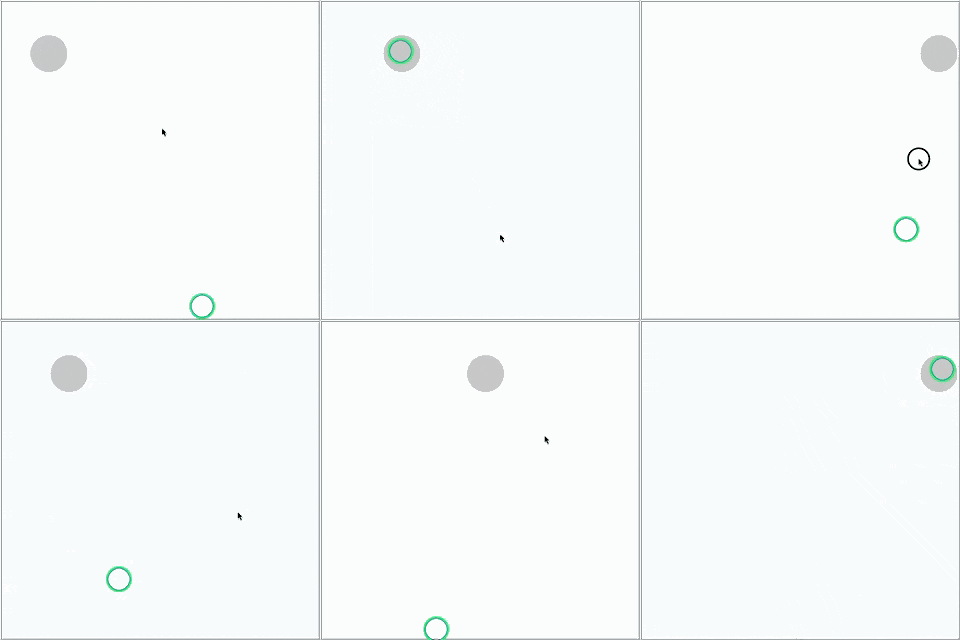
Like basketball, but not really
You will probably want to use an IDE to build the program. My favorite is NetBeans, which I will be using for future posts.
 Netbeans IDE Website
You'll also need the Java Development Kit (JDK) installed on your computer. If you have programmed in Java before, you probably already have it.
 Java 8 Development Kit
Program structure
When I talk about the Structure of a program, I mean the complex relationship between the various chunks of code that make it up. Which classes own instances of other classes? Which classes contain which methods, and when are those methods called? Should a piece of data be held locally inside a sorted array, or should it be on an external database that my program reaches out to?
These questions have different answers depending on what your program will need to do, and how it will need to grow. Ideally, you want the program to execute as little code as possible, to load the smallest possible amount of data from the HD / Network, and of course to be as simple as possible to write.

Structure Chart like these are commonly used to represent the purpose of distinct parts of code, as well as the relationship to other parts of code.
The example above is a demonstration of how a business-management program might operate. The box “Print Check” might represent a single method, a class, an entire program, or something in-between. It receives “Payroll Check Data” and returns “Check Printed” data- how that data is formatted is up to the coder.
Our PhysicsSim has fewer capabilities, and will therefor require a simpler structure. It is made of four classes-
GameController is the class that manages the overall program.
GameCanvas is responsible for displaying the game's current status.
Ball only holds variables relating to itself.
Target also only holds variables relating to itself.
Initial setup
Create a new project in your IDE of choice. Download the images below and place them in the same directory as your code files.
 Download images only
We will be building the project by introducing code files and gradually modifying them. If instead you want the finished code, you can download the images and code files below
 Download finished code and images
Creating the interface
When making a program that requires visual interaction, I usually find it easier to shape the interface first, then design the program around it. Like any other computer game, Our program will need a window to display what's happening, will need to accept interaction from the user, and will need to show updates at a constant rate. I'll use Jframe to create the window and Jcomponent to display the changes to the User. Jframe and Jcomponent are just two of the many classes used by Java to create robust interfaces. If you've ever used a program written in Java, chances are you have interacted with a Jframe, Jbutton, Jlabel, Etc.
Let's get started. Open a new project in your IDE and create a new class called GameController, and add to it the code below.
create GameController.java
import java.awt.event.MouseEvent;
import java.awt.event.MouseListener;
import java.util.TimerTask;
import javax.swing.JFrame;
import static java.lang.Math.abs;

public class GameController extends JFrame {

    boolean runGame = true;
    int boardSize_X = 600;
    int boardSize_Y = 600;
    final long cycleRate = 60;
    static java.util.Timer timer = new java.util.Timer();
    private GameCanvas gameCanvas = new GameCanvas();


    GameController() {

	super();
	this.setSize(boardSize_X, boardSize_Y + 30);
	this.setDefaultCloseOperation(JFrame.EXIT_ON_CLOSE);
	this.setVisible(true);
	this.setResizable(false);

	gameCanvas.setBounds(0, 0, boardSize_X, boardSize_Y);
	add(gameCanvas);

	TimerTask timerTask = new TimerTask() {

	    public void run() {

	    }
	};
	timer.schedule(timerTask, 0, 1000 / cycleRate);
    }

    public static void main(String[] args) {
	new GameController();
    }
}
The GameController class is a child of the JFrame class, so it will have access to all of JFrame's handy GUI-handling code. GameController class has the main() method needed by Java, as well as a constructor that sets up the window for initial use. Also inside the initial setup for the timer. It does not do anything yet- we will populate it later.
The runGame variable will be used to determine if the game loop should keep running. It is set to false when the player makes a goal, and reset to true when the mouse is clicked again.
The boardSize variables set the fixed size of our window and are used later in collision detection to determine the bounds of the pay area.
cycleRate is used to set the number of frames per second. Every frame, 3 things will happen: The program will check if the game is running with the runGame boolean, the positions of the Ball and Target will update, and the GameCanvas will redraw the Ball and Target at their new positions.
The GameCanvas class is a child of JComponent, just like how the GameController is a child of JFrame. JComponents, held inside JFrames, makes it very easy for the programmer to display / interact with windowed Java applications. JButton, JTextfield, and dozens of J-other-things are children of the JComponent class.
The timer is used to allow the physics calculations and screen rendering to take place at a fixed pace.
Next, let's create the GameCanvas class.
create GameCanvas.java
import java.awt.Color;
import java.awt.Graphics;
import java.awt.Graphics2D;
import java.awt.Shape;
import java.awt.geom.Ellipse2D;
import java.awt.geom.Rectangle2D;
import java.awt.image.BufferedImage;
import java.io.File;
import java.net.URL;
import javax.imageio.ImageIO;
import javax.swing.JComponent;

class GameCanvas extends JComponent {

    Graphics2D g2;
    BufferedImage ballImage;

    @Override
    public void paintComponent(Graphics g) {

	g2 = (Graphics2D) g;

	g2.setColor(new Color(220, 230, 230));
	g2.fill(new Rectangle2D.Double(
		0,
		0,
		this.getWidth(),
		this.getHeight()));

	Shape border = new Rectangle2D.Double(
		2,
		2,
		this.getWidth() - 4,
		this.getHeight() - 4);
	g2.setColor(Color.DARK_GRAY);
	g2.draw(border);
    }
}
The GameCanvas class starts off with ownership of two objects- a Graphics2D object (g2) and a BufferedImage (ballImage). g2 is used by the paintComponent method to draw the various shapes and images that the game needs. BallImage will later be used to hold a reference to the ball's image, which the program needs to first load from the hard drive.
The paintComponent method is key here. This method is already defined by the JComponent class, which is why we need the @Override annotation before the method declaration. Every time the repaint() method is called on a Jframe object, all the JComponents inside the JFrame have their respective paintComponent method executed (unless the programmer specifies otherwise).
Let's run the program and check the result. Not much to see, but it gives our work a checkpoint.

The blue background and thin black border defined in the GameCanvas lets us know that the GameCanvas was successfully added to it's containing GameController
Adding a little bit of life
Despite it's minimalist charm, users will quickly get bored with a blank window. Let's first create the Ball class- what the user will be directly controlling.
create Ball.java
public class Ball {

    double xPosition = 0;
    double yPosition = 0;

    double xVelocity = 0;
    double yVelocity = 0;

    final double bounciness= .8;

    final double friction = 0;

    int size;
}
Every timer tick, the position and velocity variables will be first manipulated by the GameController, then used by the GameCanvas to display the objects. Note that the X and Y components are seperate variables. This is not important, and there are several different data structures that we could have used to store this information (an double[] array, a Point() object...) It's only made this way for better clarity.
Bounciness and friction are never changed by the program, which is why they have the final attribute. bounciness is used to determine how much velocity the ball should retain when it collides with a wall, friction is really “air-friction”, or how quickly the ball naturally loses velocity. size is used by the physics calculations and by the GameCanvas
Now create the Target class. Since it extends Ball, the Target class will also have a position, velocity, and size. It won't be affected by friction or wall collisions, so we can just ignore the bounciness and friction variables. The Target only has one unique variable, accelerationModifier, which controls how fast it oscillates.
create Target.java
public class Target extends Ball {

    double accelerationModifier = 0.3;
}
Next, declare instances of the Ball and Target inside GameController. You should place these declarations next to the other 6 objects/vars the GameController owns.
add to GameController.java
 static Ball mainBall;
 static Target target;
Why are the Ball and Target static objects, you might ask? If they were only ever used inside this class (The class that owns them), they would not need to be static. But since the GameCanvas will need to know about them in order to draw them, and since GameCanvas does own have the declaration of Ball and Target, GameCanvas needs some way of referencing them. There are several ways of letting that happen, each with pros and cons, but I won't get into it on this lesson. The takeaway is- allowing the Ball and Target to be static objects lets outside classes reference them.
Inside the GameController's constructor (the method with the same name as the class itself), add the initialization code for the Ball and Target.
add to GameController.java
mainBall = new Ball();
mainBall.xPosition = 300;
mainBall.yPosition = 300;
mainBall.size = 50;

target = new Target();
target.xPosition = 40;
target.yPosition = 100;
target.size = 70;
The next chunk of code is a little heavy. Copy the entire physicsCalculations() method into the GameController class.
add to GameController.java
private void physicsCalculations() {

   // Section 1
   if (target.xPosition > boardSize_X / 2) {
       target.xVelocity -= target.directionModifier;
   }
   else if (target.xPosition < boardSize_X / 2) {
       target.xVelocity += target.directionModifier;
   }
   target.xPosition += target.xVelocity;

   // Section 2
   double gravityAcceleration = 0.5;

   mainBall.yVelocity += gravityAcceleration;

   // Section 3
   mainBall.xVelocity *= 0.99;
   mainBall.yVelocity *= 0.99;

   // Section 4
   int leftWall = 0;
   int rightWall = boardSize_X;
   int topWall = 0;
   int bottomWall = boardSize_Y;
   int ballRadius = mainBall.size / 2;
   if (mainBall.xPosition - ballRadius < leftWall) {

       mainBall.xVelocity = abs(mainBall.xVelocity) * mainBall.bounciness;
       mainBall.xPosition = leftWall + ballRadius;
   }
   if (mainBall.xPosition + ballRadius > rightWall) {

       mainBall.xVelocity = -abs(mainBall.xVelocity) * mainBall.bounciness;
       mainBall.xPosition = rightWall - ballRadius;
   }
   if (mainBall.yPosition - ballRadius < topWall) {

       mainBall.yVelocity = abs(mainBall.yVelocity) * mainBall.bounciness;
       mainBall.yPosition = topWall + ballRadius;
   }
   if (mainBall.yPosition + ballRadius > bottomWall) {

       mainBall.yVelocity = -abs(mainBall.yVelocity) * mainBall.bounciness;
       mainBall.yPosition = bottomWall - ballRadius;
   }

   // Section 5
   mainBall.xPosition += mainBall.xVelocity;
   mainBall.yPosition += mainBall.yVelocity;
}
In section 1, the Target's horizontal velocity is either added or subtracted by the directionModifier value, depending on which half of the screen it is on. This is all we need to give it that sinusoidal motion.
In section 2, the Ball's velocity is subtracted by a fixed value, which simulates gravity.
In section 3, the Ball's velocity is multiplied by a value less than 1 to simulate air resistance.
In section 4, the 4 bounding wall's positions are defined, and then compared to the position of the ball. If the ball has moved outside the bounds, it is put backside and it's X or Y velocity will invert.
In section 5, the Ball's velocity is added to it's position.
Keep in mind that the units are measured in pixels, and that this process is taking place 60 times per second. Even a low velocity (less than 5) can move the ball quickly.
Next, we need to call the method we just created. Inside the TimerTask declaration, which is inside the GameController's Constructor, replace the empty run() method with-
add to GameController.java
public void run() {

    if (runGame){

	physicsCalculations();
	repaint();
    }
}
The Ball is defined and simulated in the program. Next, we load the image file that represents it onscreen. Back inside GameController's constructor, add this line.
add to GameController.java
gameCanvas.loadImages();
Now create the method you just called. In GameCanvas, add this method.
add to GameCanvas.java
void loadImages() {

    try {

	URL url = this.getClass().getResource("Ball.png");
	if (url != null) {
	    ballImage = ImageIO.read(url);
	}
    } catch (Exception e) {
	System.out.println("Failed to load ball Image");
    }
}
Just one more thing to do before we can test again. Add this inside the paintComponent method. (Add it below the existing code that draws the border and background. Draw order is important)
add to GameCanvas.java
// Section 1
Ball ball = GameController.mainBall;
Target target = GameController.target;

// Section 2
if (target != null) {
    g2.setColor(Color.LIGHT_GRAY);
    g2.fillArc(
	    (int) (target.xPosition - (target.size) / 2),
	    (int) (target.yPosition - (target.size) / 2),
	    (int) target.size,
	    (int) target.size,
	    0,
	    360);
} else {
    System.out.println("Target could not be referenced");
}

if (ball != null) {
    if (ballImage != null) {

	g2.drawImage(ballImage,
		(int) (ball.xPosition - (ball.size / 2)),
		(int) (ball.yPosition - (ball.size / 2)),
		(int) ball.size,
		(int) ball.size,
		null);
    } else {
	Shape circle = new Ellipse2D.Double(
		(int) (ball.xPosition - (ball.size / 2)),
		(int) (ball.yPosition - (ball.size / 2)),
		(int) ball.size,
		(int) ball.size);
	g2.fill(circle);
    }
} else {
    System.out.println("Ball could not be referenced");
}
Section 1 defines the local definition of Ball and Target by reaching out to the GameController Class's static instance of Ball and Target. Section 2 paints the Ball and Target objects to the screen.
Let's run the program and watch the physicsCalculations method in action.
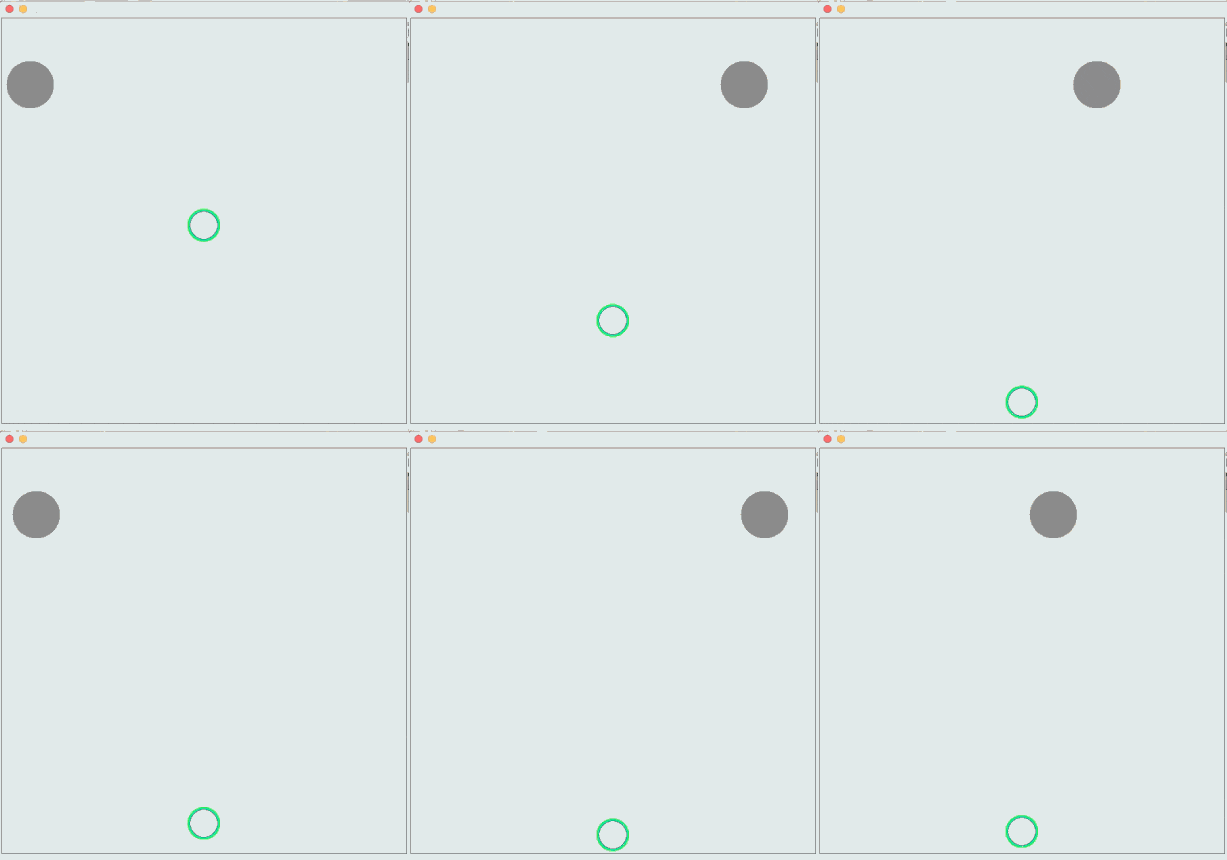
This is where the magic starts. Try changing the value of different variables, like gravity or friction or framerate. How else could the physicsCalculations method be changed to add cool new behavior?
Adding interaction
We just have a few more things to add before the game is complete. The most obvious thing we need is interaction. Since all game actions are controlled through a mouseclick, the code for interaction is pretty straightforward.
Interaction will be added through the MousListener Interface. Listeners are simply used to associate an event with a resulting code execution. The event might be a button-press in your GUI, the movement of a mouse, the press of a key on your keyboard.
Now we modify the GameController to implement MouseListener. Replace the class declaration with this.
replace inside GameController.java
public class GameController extends JFrame implements MouseListener {
Remember, MouseListener is an interface, not a class- other languages might treat interfaces differently; giving them different names or changing slightly how they are implemented / used. Apple's proprietary language, Swift, calls them Protocols.
Anyway, now that GameController has the role of MouseListener, it is expected to have all the functionality of a MouseListener too. When the mouse is pressed, the program will call a method called mousePressed on all registered MouseListeners. That means we need to define several methods that the GameController is expected by the program to have.
Put these methods inside the GameController.
add inside GameController.java
@Override public void mousePressed(MouseEvent e) {

    int clickX = e.getX();
    int clickY = e.getY();
    String clickLocation = clickX + ", " + clickY;
    System.out.println("Mouse Pressed at " + clickLocation);
}

@Override public void mouseClicked(MouseEvent e) { }
@Override public void mouseReleased(MouseEvent e) { }
@Override public void mouseEntered(MouseEvent e) { }
@Override public void mouseExited(MouseEvent e) { }
Notice that all these methods but one are completely empty. That's fine- we still include because they interface needs them to be there. The only one we will need is MousePressed.
And we need to one more thing to enable functionality. Add this line inside the GameController's constructor. It will register the GameController as a MouseListener, so the Java Virtual Machine knows where to send MouseListener events.
add inside GameController.java
this.addMouseListener(this);
If everything is configured right, you should see a message in the IDE's output console every time you click inside the program. If you are using Netbeans and don't see the console, you can view it from the menu bar: Window → Output
Turning mouseclicks into functionality is simple.
We already know the location of the click, as well as
the location of the Ball, so we use this information to
affect the Ball's velocity.
Replace them entire
MousePressed method with this.
replace inside GameController.java
@Override public void mousePressed(MouseEvent e) {

    if (runGame){

	double distanceX = (float)e.getX() - mainBall.xPosition;
	double distanceY = (float)e.getY() - mainBall.yPosition;

	double pushX = distanceX / 10;
	double pushY = distanceY / 10;

	mainBall.xVelocity += pushX;
	mainBall.yVelocity += pushY;
    }
    else{
	mainBall.xPosition = 300;
	mainBall.yPosition = 300;
	mainBall.xVelocity = 5;
	mainBall.yVelocity = 0;
	runGame = true;
    }
}
Run the program again, and see if your clicks have an effect on the ball.
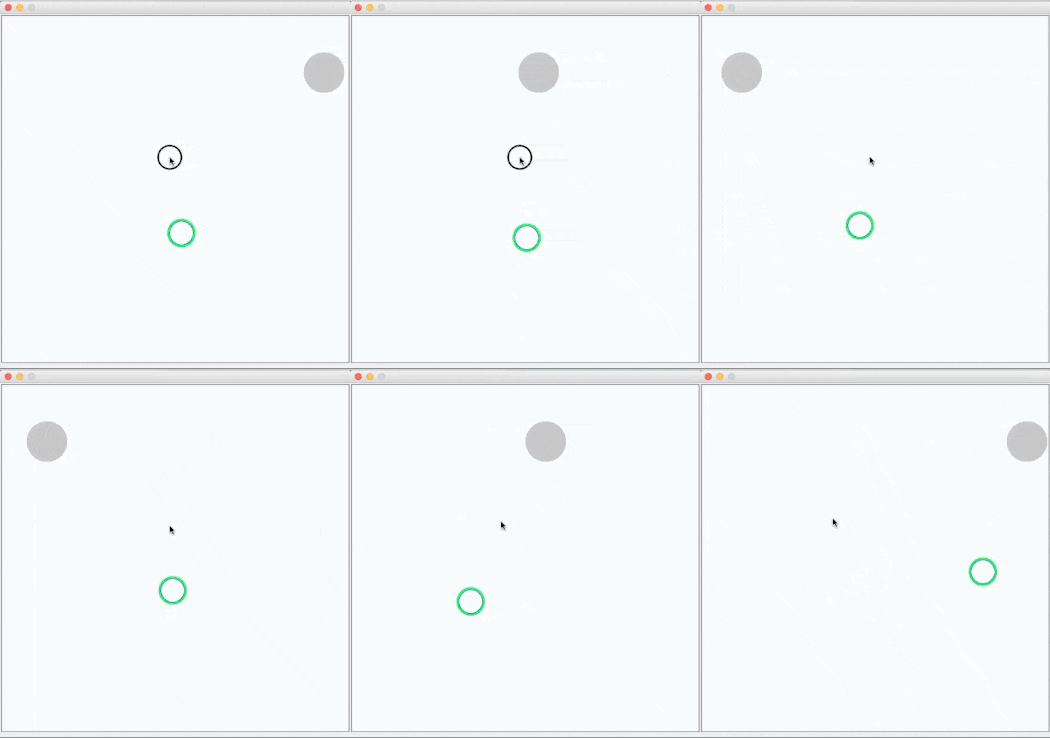
Finishing touches
The last thing to do is turn this interactive bouncing ball into a game. A game needs an immersive story, needs to give the player a sense of purpose, needs to have a memorable introduction and adrenaline-surged climactic ending.
Since we don't have any of those things, let's just try to throw the ball into the target. Add this method.
add to GameController.java
private boolean gameIsOver(){

    double distanceThreshold = 15;

    double distanceFromBallToGoal_X = mainBall.xPosition - target.xPosition;
    double distanceFromBallToGoal_Y = mainBall.yPosition - target.yPosition;

    double absoluteDistance = Math.sqrt((distanceFromBallToGoal_X * distanceFromBallToGoal_X)
	    + (distanceFromBallToGoal_Y * distanceFromBallToGoal_Y));

    if (absoluteDistance < distanceThreshold)
	return true;

    return false;
}
This method will be called every tick, just like the physicsCalculations method. If the ball is too far from the target, it returns false. If the ball is within the threshold, it returns true.
One final piece of code to add, and the game is complete! Back inside GameController's Contstructor's TimerTask, replace the existing run method with this one.
add to GameController.java
public void run() {

    if (runGame){

	physicsCalculations();

	if (gameIsOver())
	    runGame = false;

	repaint();
    }
}
Conclusion
Things to note: Because the physics calculations are so crude, there are many capabilities they cannot handle. The bounding container that the ball bounces around inside can only have a rectangular shape (think about how we check for collisions with walls). There is no code for the ball to collide with other objects: If we were to add another ball, they would pass right through each other. And the “ball” is really treated more like a square by the physics method. It has no capability to roll or deform.
Early in this post I talked about program structure. I feel like this is an under-emphasized topic in many programming lessons. As important as it is to know how to call a method, to find and fix bugs, to load and save files to storage- I feel like a good understanding of program structure is equally important. It's the difference between a sleek, efficient, modular program that even a beginner could learn to navigate... or a pile of enigmatic code spaghetti that requires a Ph.D in quantum surgery to understand.
In the next post, I will explore an alternative way to build the PhysicsSim, changing the structure and screen-rendering.
 Physics-based 2D game in Java, Pt 2
Posted Dec 19 2017

